

How to Plan a Trip: Your Complete Step-by-Step Travel Guide

If you’ve ever felt overwhelmed by the idea of planning a trip, you’re not alone. There’s so much to think about — where to go, what to do, how to fit it all in — and sometimes just getting started can be the hardest part. I love trip planning. Like, really love it. I can happily spend hours falling down internet rabbit holes about restaurants, landmarks, hidden gems, and the best walking routes between them. I actually tend to try to cram in WAY MORE than I should, which can create some tension if I don’t communicate with my family about my ideas and get their input. Over time, I’ve found that doing the legwork before you leave can completely change the outcome of your vacation. You avoid the dreaded “what should we eat?” debates, don’t waste time zig-zagging across town, and make the most of your days. Of course, not everything goes according to plan — and that’s fine — but starting with a solid outline sets you up for a much smoother trip. That’s why we’ve put together this guide: to help you create your own smart, well-organized trip plan without spending weeks glued to your laptop. It’s the same process we use for our own travels, and it works whether you’re going somewhere for a weekend or a month. 1. Pick Your Destination This is often the trickiest part. The world’s huge, and there’s never enough time (or budget) to see it all. I’m always torn between visiting somewhere brand new or going back to a place that already has my heart. When deciding where to go, start with a few simple questions: What’s the vibe you’re looking for? Do you want the buzz of a big city? Lazy days on the beach? Mountain hikes? Or a mix of everything? Pin down the type of trip you’re craving — that alone can narrow your list fast. When can you go? Your travel dates can make a big difference. If you’re off work in the winter and want warm weather, head somewhere tropical. If you’re escaping summer heat, aim for cooler climates or destinations in the Southern Hemisphere. Consider peak vs. shoulder season Some places are wildly crowded (and pricey) at certain times of year. If you don’t mind slightly less-than-perfect weather, traveling during shoulder season can save money, reduce crowds, and still give you a great experience. Follow the deals Sometimes the destination chooses you. I’ve booked trips I didn’t expect to take simply because I found an amazing flight deal (more on that in Step 3). Go for a special event or experience Anchor your trip around something unique — like a music festival, cherry blossom season, or a famous scenic drive that’s only open part of the year. Need ideas? Here are some of our favorite places so far: Italy – Italy is a captivating blend of rich history, breathtaking landscapes, world-class cuisine, and vibrant culture, offering everything from ancient ruins and the canals of Venice to stunning coastlines and charming villages. Croatia – Croatia is a dazzling mix of crystal-clear Adriatic waters, medieval coastal towns, breathtaking islands, and rich cultural heritage, making it a dream destination for history lovers, nature enthusiasts, and beachgoers alike. And they have some of the best waterfalls you’ll ever see in Plitvice National Park. Hawaii – Hawaii is a tropical paradise where lush landscapes, stunning beaches, vibrant culture, and year-round sunshine come together to create the ultimate destination for relaxation, adventure, and natural beauty. Utah – Utah is an adventurer’s dream, boasting otherworldly red rock landscapes, five stunning national parks, year-round outdoor recreation, and a unique blend of natural beauty and rich pioneer heritage. Boston – Boston is a vibrant city where rich American history, world-class museums, charming neighborhoods, and a thriving food scene blend seamlessly with a lively sports culture and beautiful waterfront views. Do the Freedom Trail, either on your own or guided; it’s incredible! U.S. National Parks – Favorites include Yosemite, Zion, Yellowstone, Bryce, Acadia, Mesa Verde, and Arches. 2. Set a Travel Budget Once you’ve chosen where you’re headed, figure out how much you’re willing — and able — to spend. This includes the big stuff (flights, hotels, car rentals, taxis or Ubers) and the smaller daily costs (meals, gas, activities, tips, pet care, etc.). We use a simple travel budget spreadsheet to map out each trip. It helps us balance splurges with budget-friendly adventures so we can keep traveling without putting a strain on our finances. You can get our free spreadsheet here. 3. Track & Book Flights With your destination and budget in place, start watching airfare prices. We use a mix of free tools and paid alerts to make sure we rarely overpay. Free Tools We Love Google Flights – Lets you track specific routes and get notified when prices change. The “Explore” feature is great if you’re open to different destinations. Skyscanner – Often finds fares other sites miss, especially for international flights. Scott’s Cheap Flights (free version) – Sends alerts for discounted fares and even rare “mistake fares.” Paid Tools Worth It FareDrop – Lets you choose departure airports, destinations, and months, then sends targeted deal alerts. Hopper – Predicts whether prices will go up or down, helping you time your purchase. Pro Tip: Whenever possible, we book flights using credit card points. It’s the easiest way to get “free” travel — just by paying for everyday expenses with the right travel rewards card. 4. Book Accommodation Once flights are locked in, we jump on lodging. Popular spots can fill up quickly, especially in peak season. Our go-tos: Expedia.com – Great hotel deals and other things like rental cars. Airbnb – Perfect for longer stays, cooking meals, and feeling like a local. Booking.com – Great hotel deals and a wide range of vacation rentals. Tripadvisor – The best place to read unbiased reviews before committing. 5. Arrange Transportation Will you need a rental car? Public transit
A Complete Guide to Visiting Arches National Park
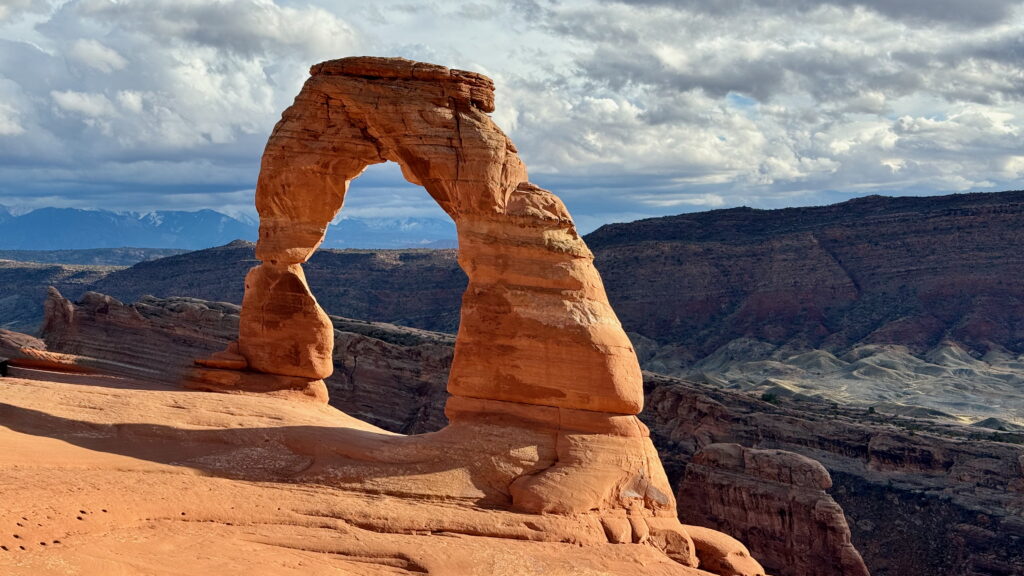
In this guide, we’re sharing everything you need to know to plan an unforgettable trip to Arches National Park—including the best hikes, when to go, where to stay and eat, and what to explore in the charming town of Moab. We recently visited Arches on a Southern Utah road trip, and the red rock landscapes left us in total awe. From iconic natural arches to epic hikes and stunning desert sunsets, Arches is one of the most photogenic and accessible national parks in the country. Whether you’re planning a family vacation or a quick weekend adventure, this blog will help you make the most of your visit! If you want to see what it’s like in Arches National Park, check out our YouTube video! About Arches National Park Arches National Park, located in eastern Utah just outside Moab, is home to more than 2,000 natural stone arches—more than any other place on Earth. These arches, along with towers, pinnacles, and fins, were sculpted over millions of years by wind, water, and erosion in the high desert climate. The park spans over 76,000 acres and offers visitors a chance to explore dramatic landscapes filled with brilliant red rock, sweeping canyons, and views that seem straight out of a movie. Fun fact: many classic westerns were filmed in the Moab area, and Arches continues to be a favorite location for photographers, adventurers, and families alike. Established as a national park in 1971 (though it was a national monument before that), Arches is a must-see destination for anyone looking to explore Utah’s famous “Mighty 5.” Before embarking on your adventure, please review the Leave No Trace principles to ensure you leave every place better than you found it, so that others can enjoy these beautiful places for many years to come! These seven principles include planning ahead and preparing, hiking and camping on durable surfaces, disposing of waste properly (pack out what you pack in!), understanding campfire rules and always fully extinguishing your fires, respecting wildlife, and being considerate of other visitors. The Different Areas of Arches National Park While Arches is a relatively small national park compared to others, it packs a lot into its scenic 18-mile main road. These are the main areas to explore, each with unique formations and accessible trailheads: 1. Park Avenue & Courthouse Towers First major stop after entering the park Tall stone walls resembling a city skyline Park Avenue Trail: 2-mile round trip walk through the canyon (great early morning light) 2. La Sal Mountains Viewpoint Epic panoramic view with contrast between red rock and snow-capped La Sal Mountains 3. Balanced Rock One of the most iconic features, viewable from the road Easy 0.3-mile loop around the formation 4. The Windows Section Home to North & South Windows, Turret Arch, and Double Arch Family-friendly hikes under 1 mile, fantastic for sunrise or sunset Great for photography and stargazing 5. Delicate Arch Area The park’s most famous feature, featured on Utah license plates Three viewpoints: Lower Viewpoint (wheelchair-accessible) Upper Viewpoint (short climb) Delicate Arch Trail (3 miles round trip, moderately strenuous hike up slickrock) 6. Devils Garden Home to Landscape Arch, the longest natural arch in North America Additional arches along the loop: Tunnel, Pine Tree, Navajo, Double O, Private Arch Total hike: 7.9-mile loop (you can do as much or as little as you like) 7. Fiery Furnace A maze of narrow sandstone canyons Requires a ranger-led tour or special permit Not recommended for young kids or anyone uncomfortable with tight spaces When to Visit Arches National Park 🗓️ When Is the Best Time to Visit Arches National Park? 🌼 Spring (March–May) Best weather: 60s–80s°F Wildflowers bloom, especially in April Popular season, so reserve permits and lodging early ☀️ Summer (June–August) Extremely hot: temps can exceed 100°F Start hikes early (sunrise) or explore scenic drives midday Bring at least 1 gallon of water per person per day 🍂 Fall (September–October) Cooler temps, fewer crowds Fall colors in the nearby La Sal Mountains Great time for night photography and stargazing ❄️ Winter (November–February) Quiet season with fewer visitors Occasional snow adds magical contrast to red rocks Roads can be icy; some trails may be closed or slippery 📝 Timed Entry Permits From April 1 to October 31, you need a timed-entry reservation between 7 AM and 4 PM. Book your entry on Recreation.gov. Getting To and Around Arches National Park Closest Town: Moab, Utah By Car: Arches is 5 miles north of downtown Moab off US-191. The park road is steep at the entrance and winds through viewpoints and trailheads. No public transportation or shuttle system, so you’ll need your own vehicle. Closest Airports: Canyonlands Field (CNY) – 18 miles from Arches (limited service) Grand Junction, CO (GJT) – 110 miles, ~2-hour drive Salt Lake City (SLC) – 230 miles, ~4-hour drive 🛞 Rental cars are available at all airports. A high-clearance vehicle is not required for Arches, but helpful if you plan to explore nearby off-road routes. Where To Stay Near Arches National Park ⛺ Inside the Park Devils Garden Campground The only campground in Arches Open year-round; reservations required March–October 51 sites, some with RV hookups $25/night; book early—it sells out quickly! 🏨 Hotels in Moab Hyatt Place Moab – Modern, family-friendly, great pool Hoodoo Moab by Hilton – Upscale, walking distance to downtown Aarchway Inn – Closer to park entrance, spacious rooms 🛖 Lodges & Resorts Red Cliffs Lodge – On the Colorado River, horseback rides, winery on-site Sorrel River Ranch – Luxury cabins, spa, farm-to-table restaurant 🏠 Vacation Rentals Modern Desert Escape – 2BR, backyard patio, 10 mins to Arches Cozy Adobe Casita – Studio with views and Southwestern decor Adventure Basecamp – 3BR, fenced yard, hot tub, pet-friendly How Much Time Do You Need at Arches National Park? You can see the major highlights in one full day, but ideally, plan for 2–3 days to hike more trails, photograph arches at sunrise/sunset, and avoid mid-day